Sunday, August 30, 2020

TLS-Attacker V2.2 And The ROBOT Attack

We found out that many TLS implementations are still vulnerable to different variations of a 19-year old Bleichenbacher's attack. Since Hanno argued to have an attack name, we called it ROBOT: https://robotattack.org

Given the new attack variants, we released a new version of TLS-Attacker 2.2, which covers our vulnerabilities.

Bleichenbacher's attack from 1998

In 1998, Daniel Bleichenbacher discovered that the error messages given by SSL servers for errors in the PKCS #1 1.5 padding allow an adversary to execute an adaptive-chosen ciphertext attack. This attack also belongs to the category of padding oracle attacks. By performing the attack, the adversary exploits different responses returned by the server that decrypts the requests and validates the PKCS#1 1.5 padding. Given such a server, the attacker can use it as an oracle and decrypt ciphertexts.
We refer to one of our previous blog posts for more details.

OK, so what is new in our research?

In our research we performed scans of several well-known hosts and found out many of them are vulnerable to different forms of the attack. In the original paper, an oracle was constructed from a server that responded with different TLS alert messages. In 2014, further side-channels like timings were exploited. However, all the previous studies have considered mostly open source implementations. Only a few vulnerabilities have been found.

In our scans we could identify more than seven vulnerable products and open source software implementations, including F5, Radware, Cisco, Erlang, Bouncy Castle, or WolfSSL. We identified new side-channels triggered by incomplete protocol flows or TCP socket states.

For example, some F5 products would respond to a malformed ciphertext located in the ClientKeyExchange message with a TLS alert 40 (handshake failure) but allow connections to timeout if the decryption was successful. We could observe this behaviour only when sending incomplete TLS handshakes missing ChangeCipherSpec and Finished messages.
See our paper for more interesting results.

Release of TLS-Attacker 2.2

These new findings motivated us to implement the complete detection of Bleichenbacher attacks in our TLS-Attacker. Before our research, TLS-Attacker had implemented a basic Bleichenbacher attack evaluation with full TLS protocol flows. We extended this evaluation with shortened protocol flows with missing ChangeCipherSpec and Finished messages, and implemented an oracle detection based on TCP timeouts and duplicated TLS alerts. In addition, Robert (@ic0ns) added many fixes and merged features like replay attacks on 0-RTT in TLS 1.3.
You can find the newest version release here: https://github.com/RUB-NDS/TLS-Attacker/releases/tag/v2.2

TLS-Attacker allows you to automatically send differently formatted PKCS#1 encrypted messages and observe the server behavior:
$ java -jar Attacks.jar bleichenbacher -connect [host]:[port]
In case the server responds with different error messages, it is most likely vulnerable. The following example provides an example of a vulnerable server detection output:
14:12:42 [main] CONSOLE attacks.impl.Attacker - A server is considered vulnerable to this attack if it responds differently to the test vectors.
14:12:42 [main] CONSOLE attacks.impl.Attacker - A server is considered secure if it always responds the same way.
14:12:49 [main] CONSOLE attacks.impl.Attacker - Found a difference in responses in the Complete TLS protocol flow with CCS and Finished messages.
14:12:49 [main] CONSOLE attacks.impl.Attacker - The server seems to respond with different record contents.
14:12:49 [main] INFO attacks.Main - Vulnerable:true
In this case TLS-Attacker identified that sending different PKCS#1 messages results in different server responses (the record contents are different).
Related links

  1. Hacking Tools For Beginners
  2. Hacking Tools Windows
  3. Hacker Hardware Tools
  4. Pentest Automation Tools
  5. Usb Pentest Tools
  6. Hacking Tools 2020
  7. Pentest Tools Download
  8. Hack Tools 2019
  9. Hack Tool Apk No Root
  10. Pentest Tools Linux
  11. Hacker Tools Online
  12. Hacking Tools For Pc
  13. New Hack Tools
  14. Hacking Tools Software
  15. Bluetooth Hacking Tools Kali
  16. Android Hack Tools Github
  17. Physical Pentest Tools
  18. Hacker Tools Apk Download
  19. Pentest Tools Alternative
  20. Pentest Tools Tcp Port Scanner
  21. Hack Rom Tools
  22. Hacking Apps
  23. Easy Hack Tools
  24. Pentest Tools Website
  25. Best Pentesting Tools 2018
  26. Hacking Tools Usb
  27. Pentest Tools Nmap
  28. Hacker Tool Kit
  29. Pentest Tools Website Vulnerability
  30. Hacking Tools Windows
  31. How To Install Pentest Tools In Ubuntu
  32. Hack Tools For Games
  33. Hack Tools Online
  34. Ethical Hacker Tools
  35. Hacking Tools Kit
  36. Hack Tools Download
  37. Hack Tool Apk No Root
  38. Hacking Tools For Windows 7
  39. Hack Tools Mac
  40. Pentest Tools Android
  41. Hack Tools For Windows
  42. Hack And Tools
  43. Pentest Tools Bluekeep
  44. Hacking App
  45. Hacker Tools Apk Download
  46. Hack Tools Download
  47. Nsa Hack Tools Download
  48. Hacker Hardware Tools
  49. Kik Hack Tools
  50. Black Hat Hacker Tools
  51. Github Hacking Tools
  52. Hacker Tools For Mac
  53. Top Pentest Tools
  54. Hacking Tools And Software
  55. Hack Tools For Games
  56. Hacker Tools Linux
  57. How To Hack
  58. Hacker Hardware Tools
  59. Blackhat Hacker Tools
  60. How To Install Pentest Tools In Ubuntu
  61. Pentest Tools Find Subdomains
  62. Hacking Tools Pc
  63. Hacker Search Tools
  64. Pentest Tools Apk
  65. Hacker Tools Github
  66. Hacker Hardware Tools
  67. Hacker Tools List
  68. What Is Hacking Tools
  69. Hacker Tools 2020
  70. What Are Hacking Tools
  71. Hack Tools For Games
  72. Nsa Hack Tools
  73. Hacking Tools For Windows
  74. Ethical Hacker Tools
  75. Pentest Tools For Android
  76. Best Hacking Tools 2020
  77. Hacking Tools Kit
  78. Hacking Tools Name
  79. Hacker Tools Apk
  80. Pentest Tools Android
  81. Pentest Tools Kali Linux
  82. Hack Website Online Tool
  83. Hack Tools Online
  84. Pentest Tools Windows
  85. Pentest Recon Tools
  86. Hacker Tools Free Download
  87. Hak5 Tools
  88. Pentest Tools
  89. Pentest Tools Subdomain
  90. Hacking Tools Windows
  91. Pentest Automation Tools
  92. Hacker Techniques Tools And Incident Handling
  93. Pentest Tools Download
  94. Hacks And Tools
  95. Hack Tools For Pc
  96. Pentest Tools Open Source
  97. Hack Tools For Ubuntu
  98. Hacker Techniques Tools And Incident Handling
  99. Hack Tools
  100. Hacker Tools Github
  101. Hacker Tools For Ios

Saturday, August 29, 2020

CEH: Identifying Services & Scanning Ports | Gathering Network And Host Information | NMAP


CEH scanning methodology is the important step i.e. scanning for open ports over a network. Port is the technique used to scan for open ports. This methodology performed for the observation of the open and close ports running on the targeted machine. Port scanning gathered a valuable information about  the host and the weakness of the system more than ping sweep.

Network Mapping (NMAP)

Basically NMAP stands for Network Mapping. A free open source tool used for scanning ports, service detection, operating system detection and IP address detection of the targeted machine. Moreover, it performs a quick and efficient scanning a large number of machines in a single session to gathered information about ports and system connected to the network. It can be used over UNIX, LINUX and Windows.

There are some terminologies which we should understand directly whenever we heard like Open ports, Filtered ports and Unfiltered ports.

Open Ports means the target machine accepts incoming request on that port cause these ports are used to accept packets due to the configuration of TCP and UDP.

Filtered ports means the ports are usually opened but due to firewall or network filtering the nmap doesn't detect the open ports.

Unfiltered means the nmap is unable to determine whether the port is open or filtered  while the port is accessible.

Types Of NMAP Scan


Scan TypeDescription
Null Scan This scan is performed by both an ethical hackers and black hat hackers. This scan is used to identify the TCP port whether it is open or closed. Moreover, it only works over UNIX  based systems.
TCP connectThe attacker makes a full TCP connection to the target system. There's an opportunity to connect the specifically port which you want to connect with. SYN/ACK signal observed for open ports while RST/ACK signal observed for closed ports.
ACK scanDiscovering the state of firewall with the help ACK scan whether it is stateful or stateless. This scan is typically used for the detection of filtered ports if ports are filtered. Moreover, it only works over the UNIX based systems.
Windows scanThis type of scan is similar to the ACK scan but there is ability to detect an open ports as well filtered ports.
SYN stealth scanThis malicious attack is mostly performed by attacker to detect the communication ports without making full connection to the network.
This is also known as half-open scanning. 


All NMAP Commands 


CommandsScan Performed
-sTTCP connect scan
-sSSYN scan
-sFFIN scan
-sXXMAS tree scan
-sNNull scan
-sPPing scan
-sUUDP scan
-sOProtocol scan
-sAACK scan
-sWWindow scan
-sRRPC scan
-sLList/DNS scan
-sIIdle scan
-PoDon't ping
-PTTCP ping
-PSSYN ping
-PIICMP ping
-PBICMP and TCP ping
-PBICMP timestamp
-PMICMP netmask
-oNNormal output
-oXXML output
-oGGreppable output
-oAAll output
-T ParanoidSerial scan; 300 sec between scans
-T SneakySerial scan; 15 sec between scans
-T PoliteSerial scan; .4 sec between scans
-T NormalParallel scan
-T AggressiveParallel scan, 300 sec timeout, and 1.25 sec/probe
-T InsaneParallel scan, 75 sec timeout, and .3 sec/probe


How to Scan

You can perform nmap scanning over the windows command prompt followed by the syntax below. For example, If you wanna scan the host with the IP address 192.168.2.1 using a TCP connect scan type, enter this command:

nmap 192.168.2.1 –sT

nmap -sT 192.168.2.1

Related word

Recovering Data From An Old Encrypted Time Machine Backup

Recovering data from a backup should be an easy thing to do. At least this is what you expect. Yesterday I had a problem which should have been easy to solve, but it was not. I hope this blog post can help others who face the same problem.


The problem

1. I had an encrypted Time Machine backup which was not used for months
2. This backup was not on an official Apple Time Capsule or on a USB HDD, but on a WD MyCloud NAS
3. I needed files from this backup
4. After running out of time I only had SSH access to the macOS, no GUI

The struggle

By default, Time Machine is one of the best and easiest backup solution I have seen. As long as you stick to the default use case, where you have one active backup disk, life is pink and happy. But this was not my case.

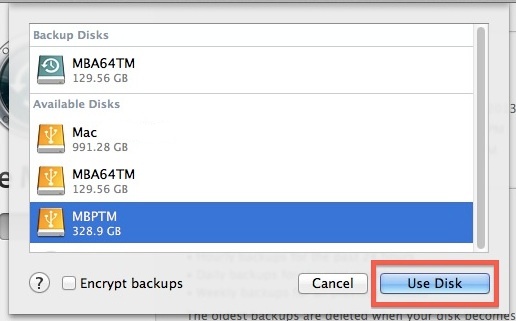
As always, I started to Google what shall I do. One of the first options recommended that I add the backup disk to Time Machine, and it will automagically show the backup snapshots from the old backup. Instead of this, it did not show the old snapshots but started to create a new backup. Panic button has been pressed, backup canceled, back to Google.


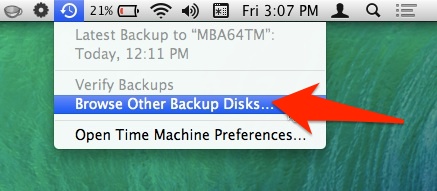
Other tutorials recommend to click on the Time Machine icon and pressing alt (Option) key, where I can choose "Browse other backup disks". But this did not list the old Time Machine backup. It did list the backup when selecting disks in Time Machine preferences, but I already tried and failed that way.


YAT (yet another tutorial) recommended to SSH into the NAS, and browse the backup disk, as it is just a simple directory where I can see all the files. But all the files inside where just a bunch of nonsense, no real directory structure.

YAT (yet another tutorial) recommended that I can just easily browse the content of the backup from the Finder by double-clicking on the sparse bundle file. After clicking on it, I can see the disk image on the left part of the Finder, attached as a new disk.
Well, this is true, but because of some bug, when you connect to the Time Capsule, you don't see the sparse bundle file. And I got inconsistent results, for the WD NAS, double-clicking on the sparse bundle did nothing. For the Time Capsule, it did work.
At this point, I had to leave the location where the backup was present, and I only had remote SSH access. You know, if you can't solve a problem, let's complicate things by restrict yourself in solutions.

Finally, I tried to check out some data forensics blogs, and besides some expensive tools, I could find the solution.

The solution

Finally, a blog post provided the real solution - hdiutil.
The best part of hdiutil is that you can provide the read-only flag to it. This can be very awesome when it comes to forensics acquisition.


To mount any NAS via SMB:
mount_smbfs afp://<username>@<NAS_IP>/<Share_for_backup> /<mountpoint>

To mount a Time Capsule share via AFP:
mount_afp afp://any_username:password@<Time_Capsule_IP>/<Share_for_backup> /<mountpoint>

And finally this command should do the job:
hdiutil attach test.sparsebundle -readonly

It is nice that you can provide read-only parameter.

If the backup was encrypted and you don't want to provide the password in a password prompt, use the following:
printf '%s' 'CorrectHorseBatteryStaple' | hdiutil attach test.sparsebundle -stdinpass -readonly

Note: if you receive the error "resource temporarily unavailable", probably another machine is backing up to the device

And now, you can find your backup disk under /Volumes. Happy restoring!

Probably it would have been quicker to either enable the remote GUI, or to physically travel to the system and login locally, but that would spoil the fun.
Continue reading

WordPress 5.0.0 Crop-Image Shell Upload Exploit

Related word
  1. Pentest Tools Kali Linux
  2. Bluetooth Hacking Tools Kali
  3. Pentest Tools Windows
  4. Pentest Tools Kali Linux
  5. Hacker Tools Free
  6. Hack Tools For Mac
  7. Pentest Tools For Android
  8. Hacking Tools Mac
  9. Hacker Tools Free
  10. Growth Hacker Tools
  11. Hacking Tools Windows
  12. Pentest Tools Website
  13. Pentest Recon Tools
  14. What Are Hacking Tools
  15. Pentest Tools Find Subdomains
  16. Tools 4 Hack
  17. Hak5 Tools
  18. Hacking Tools For Windows 7
  19. Hack Tools
  20. Hacking Tools For Kali Linux
  21. Pentest Tools Github
  22. Pentest Tools
  23. Pentest Tools For Mac
  24. Pentest Tools
  25. Black Hat Hacker Tools
  26. Pentest Automation Tools
  27. Hack Tools For Pc
  28. Hacker Tools Software
  29. Kik Hack Tools
  30. Hack Tools Online
  31. Hack Tools Github
  32. Hacker Security Tools
  33. Hacker Tools List
  34. Hackrf Tools
  35. Hack Tool Apk No Root
  36. Computer Hacker
  37. Hacking Tools Github
  38. Hacker Tools Github
  39. Hacker Hardware Tools
  40. Hacker Tools Free
  41. Pentest Tools Port Scanner
  42. Hacking Tools 2020
  43. Best Hacking Tools 2019
  44. Hacker Tools List
  45. Hack Tools
  46. Hack And Tools
  47. Top Pentest Tools
  48. Hacker Tool Kit
  49. Hacking Tools And Software
  50. Hacking Tools Name
  51. Hacking Tools Free Download